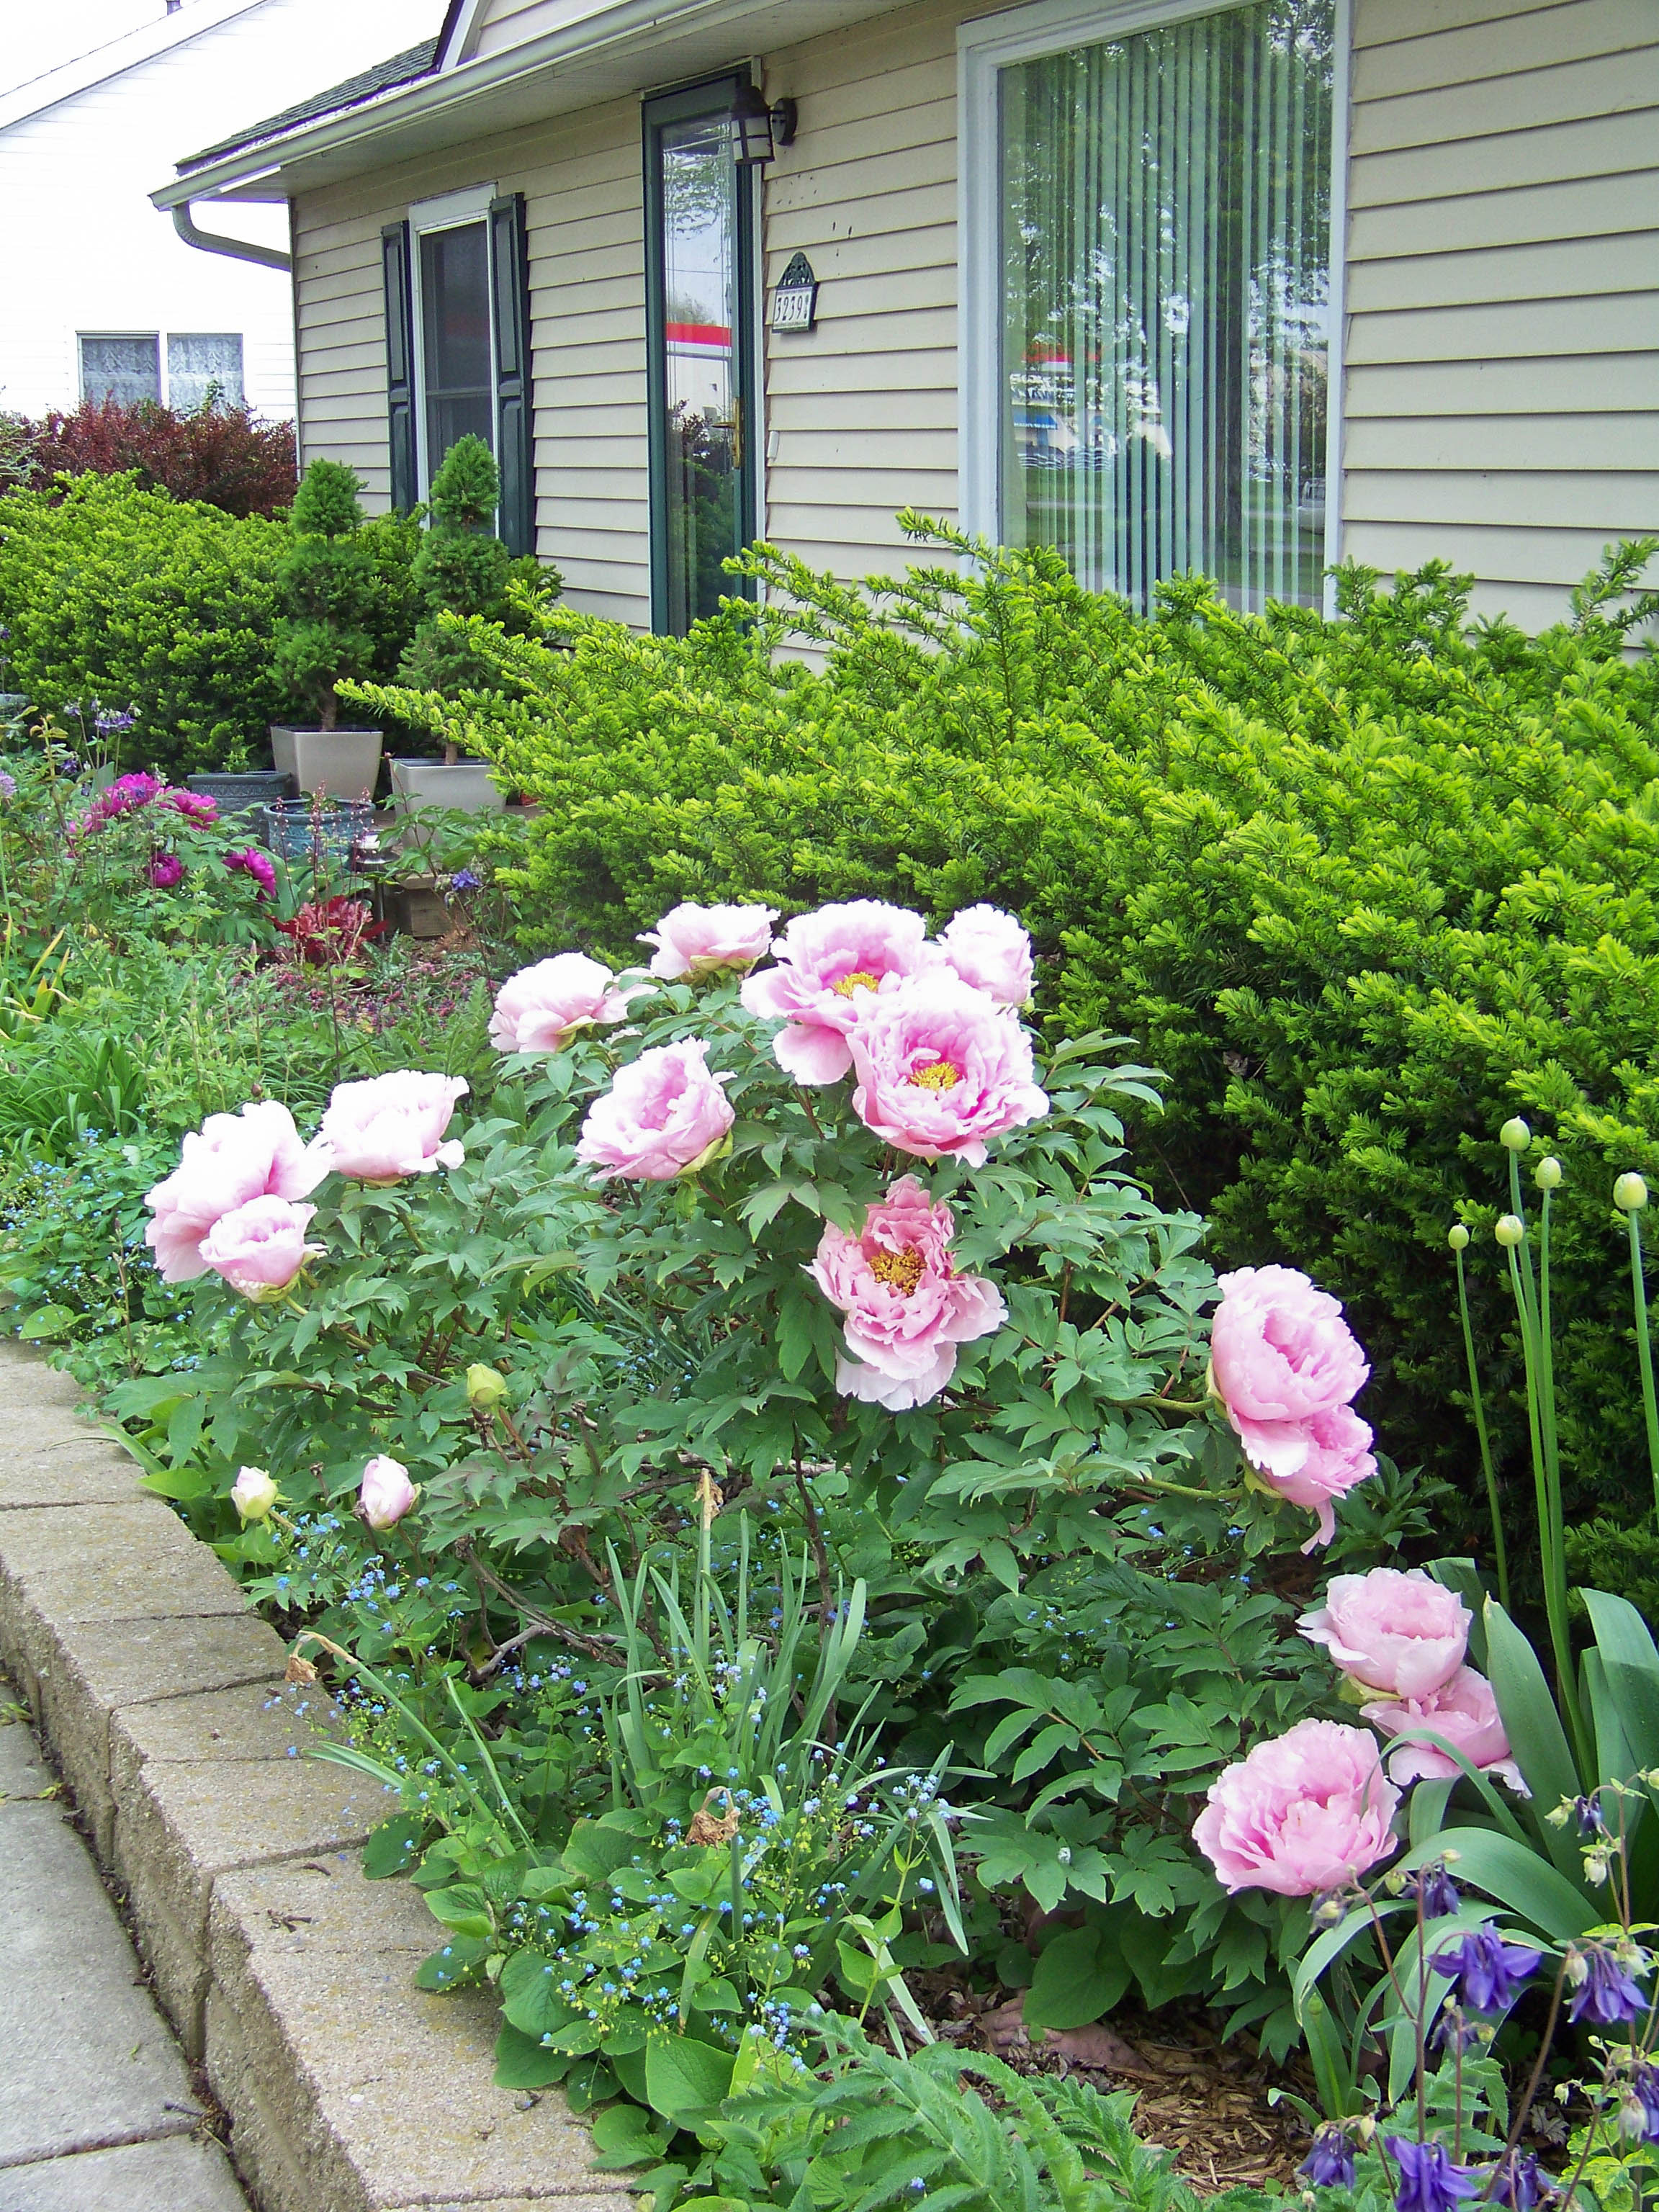
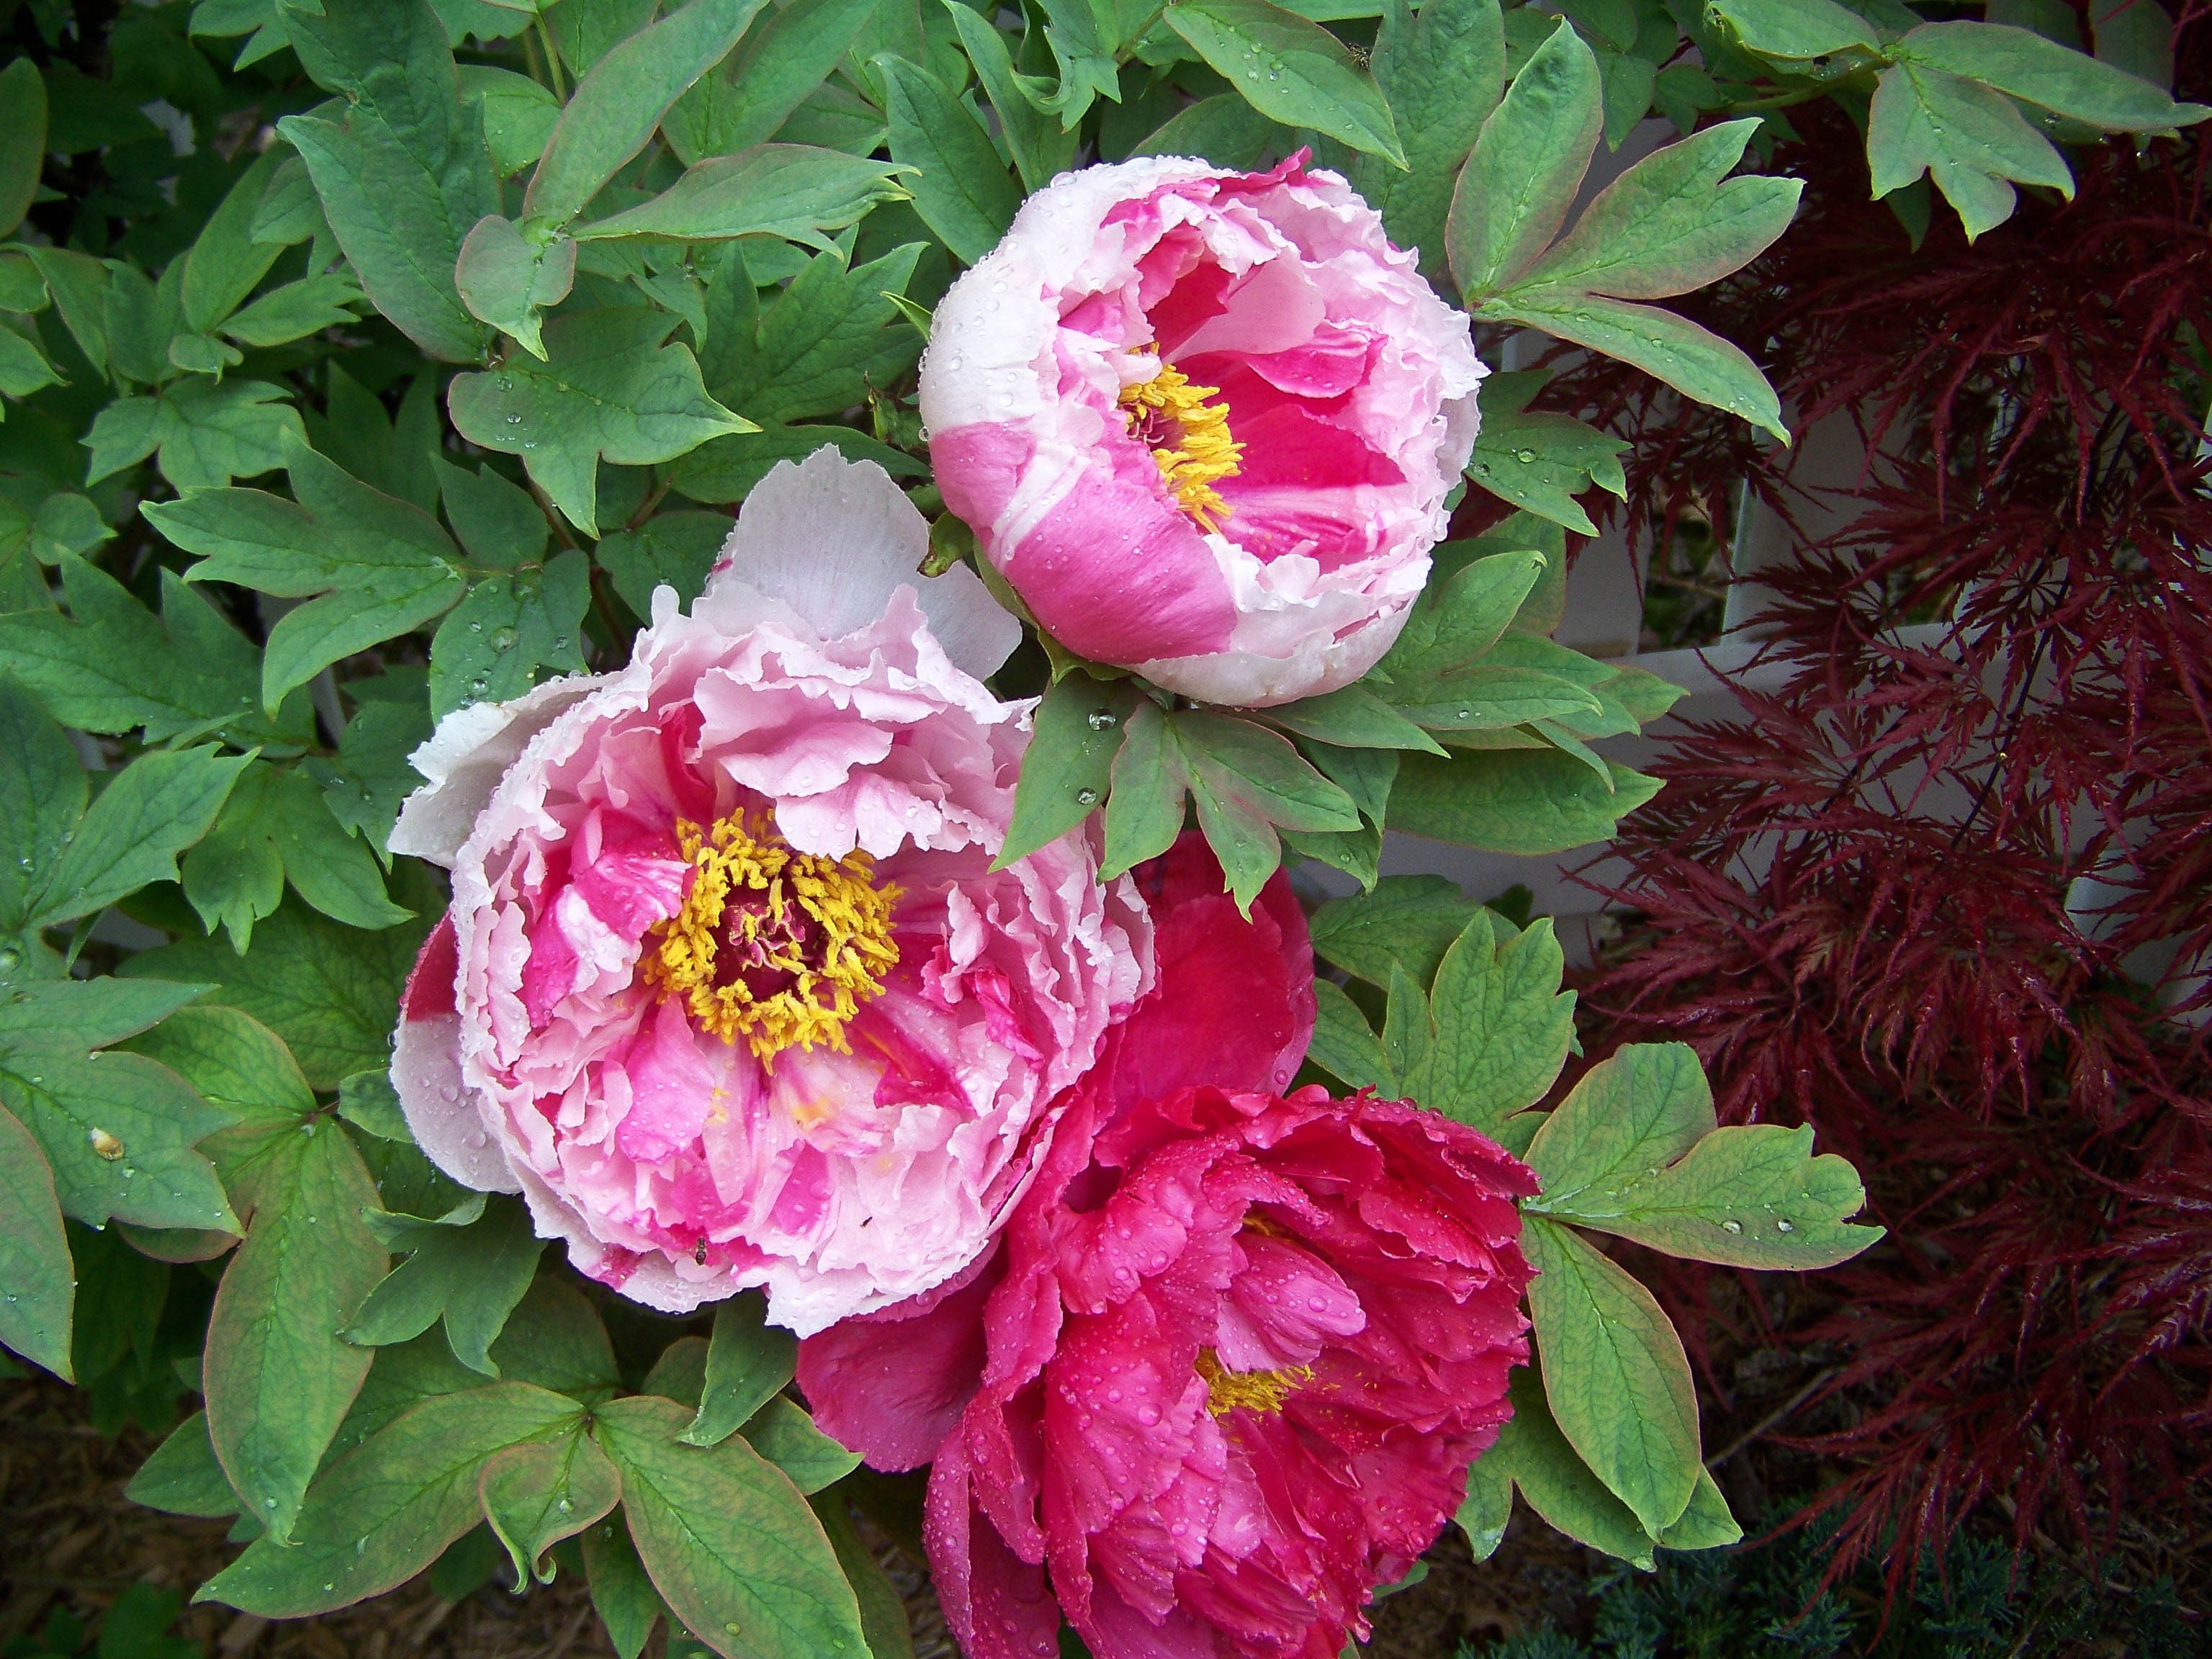
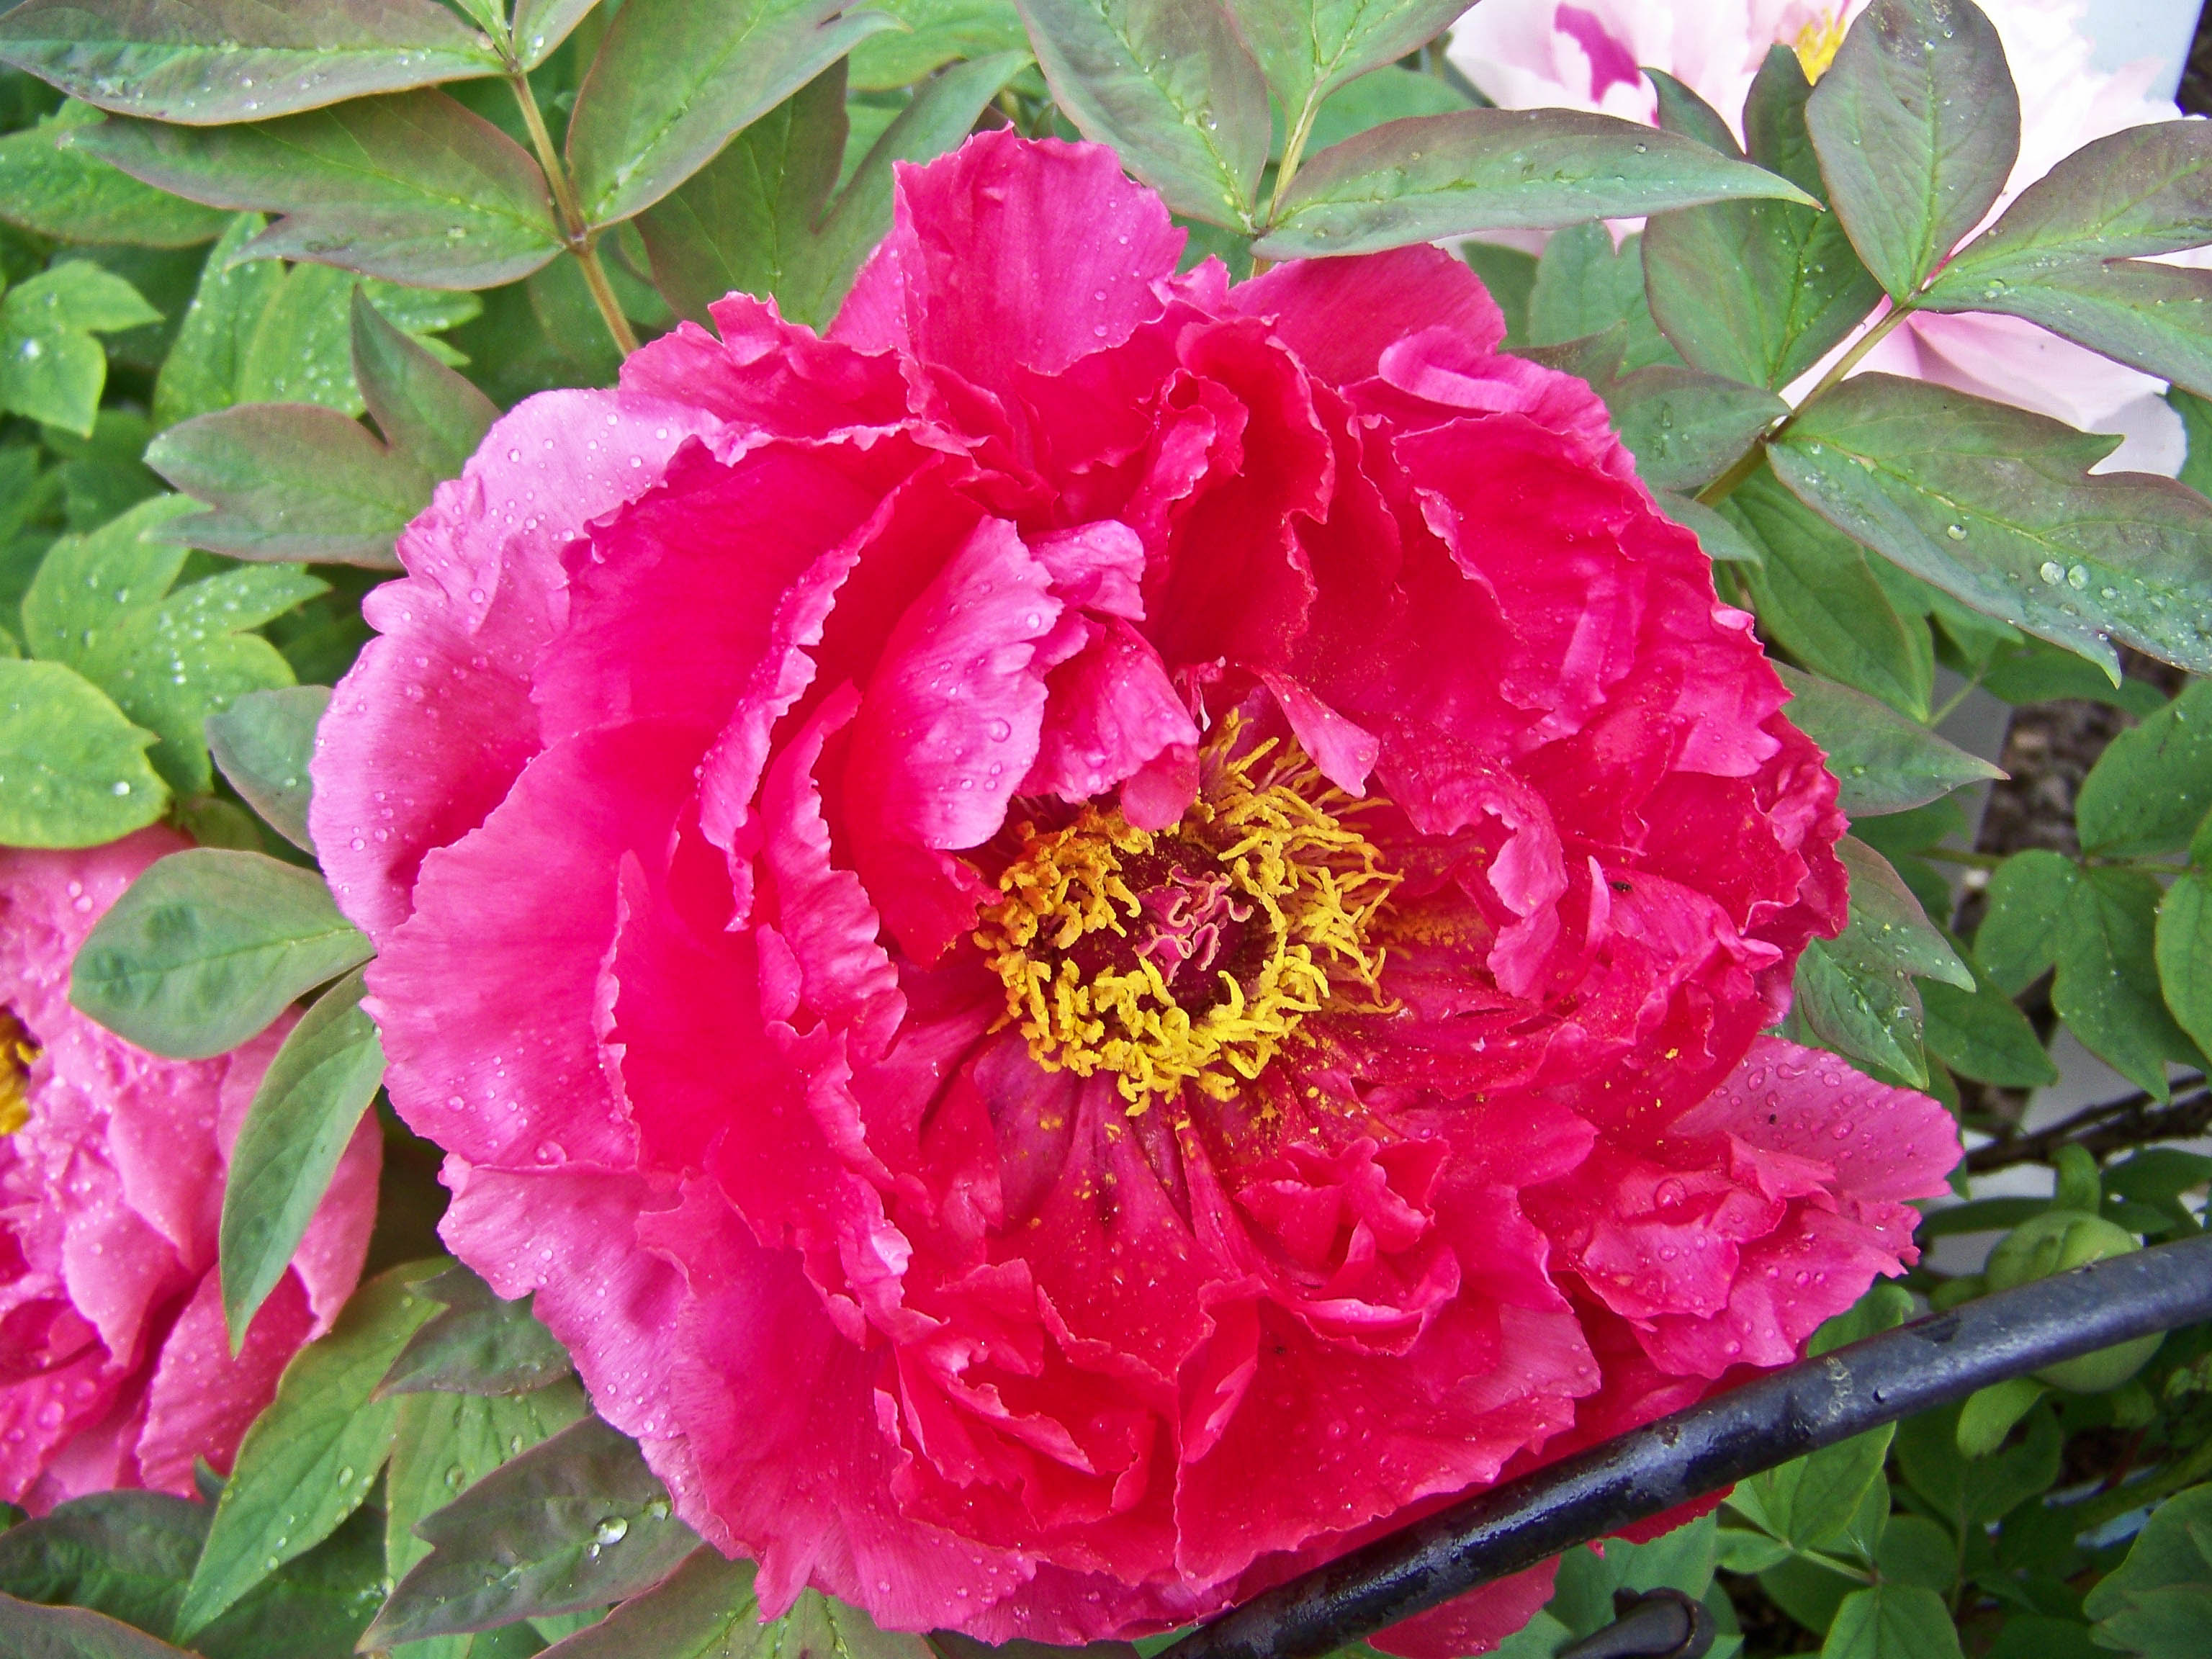
Linda Welch sent in photos of her tree peony specimens. They are stunning! I posted these in “gallery” style. Click on the first photo and you will be able to view each of these as a large image and you can advance to the next photo by clicking on the arrow. These are definitely worth viewing large!
Archive for the ‘Garden Showcase’ Category
FotoFriday May 4, 2012
Posted in FotoFriday, Garden Showcase, Perennials, Trees and Shrubs on May 4, 2012| Leave a Comment »


Stretching the Gardening Season into Winter – by Mary Ellen Babich
Posted in Garden Showcase, Uncategorized on February 26, 2012| 4 Comments »
We use our gardening knowledge and experience to challenge ourselves to create gardens we can enjoy into late Autumn. Then Winter arrives, most gardening activities come to an abrupt halt, and we become armchair gardeners, paging through seed catalogues and occasionally looking out the window to see if the birdfeeders need filling. Maybe we should get up out of our cozy chairs, take a critical look at our Winter gardens, and consider how we can improve them to extend the gardening season even further by adding more Winter interest.
Spring, Summer, and Autumn gardens are relatively easy to plan and execute when compared to Winter gardens. During the warmer seasons we spend most of our gardening hours, hands-on, drawing, digging, planting, weeding, mowing, and simply enjoying everything connected to being outdoors. Winter changes all of that. The drop in temperature alone presents gardeners with an extreme obstacle to overcome: we don’t want to go outside into the cold. And there aren’t any flowering or green leafy plants to enjoy. But gardening and garden designing are not just warm weather endeavors.
Winter presents us with an opportunity to enjoy the overall structure of our gardens because there are no plants to distract us. Think about how you can adjust your landscape canvas by adding various elements when the weather permits. Adding trees, shrubs, and grasses with dramatic colors or interesting shapes clearly extend the garden season beyond Summer and into Autumn. To make an easy transition into Winter interest, plant deciduous shrubs likecontorted filbert and red twig dogwood. To take Winter interest even further, add evergreens such as hemlock, spruce, or pines. To complement the plant material, add hardscape elements such as fences, sculpture, or fountains.
To fully appreciate Winter gardening, we must engage our senses of sight, smell, touch, taste, and hearing with greater intensity. To do this you must go outside and observe your gardens like you do in the other seasons. Look around. With shorter days and tree canopies gone, the lighting is very different. Breathe in the cold, clean air. Touch the shaggy bark on a deciduous tree. Taste a snowflake or an icicle. Listen to the rustling of tree limbs in the wind.
Once you’ve engaged your Winter senses, identify a structural element that you enjoy observing from inside your home during the Winter months and begin to track it with the seasons. The structural element you choose can be a tree, stone bench, rose arbor, or fence. Does the element complement or compete with the surrounding plant material? Should the element be relocated or should plant material be rearranged to create a more harmonious design? How can you design this space for optimum appeal year round when viewing it both from inside and outside your home?
I track several structural elements in my gardens, but I particularly enjoy tracking the garden seasons around the cairn my husband and I built in my shade garden. Cairn is a word of Scottish origin meaning literally a “heap of rocks.” As you will see, this heap of rocks, a permanent sculpture in my garden, changes with the seasons.
CAIRN 1 SPRING
Color in the Spring shade garden abounds where Trillium, sweet woodruff, ferns, and ginger punctuate the foreground of the cairn.

CAIRN 2 SUMMER
Long blooming Cornus kousa dogwood adds a splash of color lasting several weeks in the Summer shade garden.

CAIRN 3 AUTUMN
Golden leaves crunch underfoot while the shade garden foliage continues it’s show in the Autumn garden.

CAIRN 4 WINTER
Obscured by a deep Winter snowfall, the cairn becomes a perfect cone rising out of the landscape.

If you don’t include your Winter gardens in your ongoing design process, you’re missing a great opportunity to extend your gardening into another season.
Indoor Poinsettia Vertical Garden Project – Quick and Easy!
Posted in Garden Showcase, Uncategorized on December 18, 2011| 1 Comment »
This past week Linda Welch demonstrated for me how to make an easy indoor vertical garden, using inexpensive wood file holders, breathable yet waterproof Wally Pocket Planters, and poinsettias. This project is simple enough for someone with limited skill using tools or doing household projects to accomplish, and quick and easy enough to still do before Christmas!
Linda found some inexpensive wood file holders with legs that allowed them to stand unsupported (although the possibilities are endless for choice of container.) To prevent the file holders from tipping forward after planting, she drilled a small hole through each into the wall behind, and secured them with a screw. (For more sturdy anchoring, Wallys come with plastic wall anchors included.) From there it was a simple matter to insert a Wally into each file slot, then plant a poinsettia into each Wally. Start to finish it took 35 minutes! Linda plans on using it year-round, planting spring-blooming bulbs after the poinsettias are finished. What an easy way to bring a garden indoors, and the result is stunning!
Top Bakers Dozen 2011…
Posted in Community Projects, Events, FotoFriday, Garden Showcase, MC Demonstration Garden, Recipes, Uncategorized on November 7, 2011| 7 Comments »
Where has the year gone? In less than a week we will be having our annual recognition banquet, which unfortunately I am unable to attend. Therefore, I would like to make a few recognitions of my own, based on what I have observed this year. Lot of people have worked hard, and these are my personal picks. I hope I am not embarrassing or offending anyone – but the following members I am sure you will agree are particularly deserving of our recognition and thanks for their efforts and valuable contribution to the club.
- Naida Albin – The Work & Learn Crew: Her tireless efforts along with my regulars, the Milan gang and Mark Havekost, are the reason we were able to restore the gardens to what they should be. A consumate gardener and workaholic, she tends at least three other local gardens that I know of in addition to her own, and is very supportive of any MG activity. A very modest person, I do not want to embarrass her further by listing her numerous other achievements.
- Sue Ryan – Blogmeister: The reason that you are able to read this – is because of the efforts of this one person in setting up and maintaining our blog, from conception to where it is now! Sue’s talents as a photographer and an uplifting script writer have given our fledgling venture a polished, professional look – and a much needed voice for the association. Did I mention this is all done after 10 hour work shifts and numerous stints weeding the office garden? She has put in hundreds of hours into making this happen because she is totally committed to making this blog a success, and something we can all be proud of.
- Linda Welch – Most Involved MG: It is no exaggeration to say Linda is everywhere there is activity in the club. From single-handedly renovating our previous projects in the Veterans Park, planting the new sundial beds, weeding the office garden and being a cheerful booster for the club. Most of you know her from her garden design presentations and numerous photographs of her lovely garden and plant choices in the blog – where she is a founding editor and frequent contributor.
- Sharon Diefenthaler – Best Community Outreach: Being a MG is all about community outreach. Sharon is fortunate in that she has been able to incorporate this mission statement into her ISD program at Matthes’ greenhouse. All of her students graduate as Junior MGs and the work ethic and skills they learn as being part of her program, will prepare them for being productive citizens. She is an active participant in the IHM community gardens, Bedford Library gardens and with her students, in Mercy Memorial greenhouse and gardens.
- Carol Koesel – Best Project: Thanks to Carol, we finally were able to have a raised bed veggie garden as a teaching tool in our demo garden. This feature was long overdue! Skillfully using a 3 x 4 seed bag, Carol planted a mini- garden that yielded a surprising array and quantity of vegetables, all of which were grown in our own compost…Mel Bartholomew would definitely approve! I certainly appreciate her garden knowledge and deft touch in maintaining the Memorial Garden, which she helped design and install.
- Lenore Wood – Most Under-appreciated Worker: Lenore is the Rodney Dangerfield of the association. She is the one who toils away maintaining the beds at Fairview Hospital, her church and when time permits, she comes and weeds our garden. Lenore works alone and is publicity shy, so many of you have little idea what this woman accomplishes. Her dedication to community outreach is something the association should acknowledge and embrace.
- Karen Hehl – Best Photography Submission: A lot of you know Karen’s handiwork from past garden tours. Come fall, she is a regular feature around the office garden weeding and clipping. What I didn’t realize was just how accomplished a photographer she really is. Her photos of the pepper arrangement are of professional quality and would not be out of place in the pages of Gourmet magazine. Both Sue and I are unanimous in this choice of her outstanding FotoFriday submission.
- Sandy O’Connell – Most Informative Newsletter Article: Most of you know this garrulous upstate New Yorker as a hardworking, weed-pulling terror with her designer weeding hoe. But she is also an accomplished writer as is shown in her past newsletter article on her visit to the home of pioneering naturalist, Gene Stratton-Porter. Truly an outstanding article with superb photographs that help make our newsletter one of the best in the region.
- Georgeann Brown – Best Food Presenter: This is just another facet of the multi-talented persona of our longest serving MG. In addition to being Jennie’s first graduate, GB has brought a wealth of experience and gardening knowledge to this club over the years, as well as holding every office and one of the originators of the W & L program! Her interest in herbs was recently coupled with her passion for food in a most interesting and lively presentation on Sweet and Savory Herb cooking, that was extremely well received.
- Mary Ellen and Stella – Children’s Garden: One of the true little gems in our exhibition garden, this area is lovingly planted and nurtured each year by Mary Ellen and Stella. I just love the Japanese theme and the choice of plantings that always seem to be doing something different throughout the year. I was lucky enough to snap a few photos of some children enjoying the gardens…which says it all!
- Sharon, Winnie & Karen – Best Team Presentation: The award for the best tag-team presentation has to go to this trio! In spite of an advertising snafu, they managed to draw in 10 members of the public in addition to a full house of MGs for a lively and interesting Herbs, Senses class. The room smelled terrific with all the herbs and freshly baked bread and they managed to compliment each other very well in getting their message out…by working as a team…a novel idea!
- Chris Edolls – Most Informative Presentation: In addition to being our treasurer, Chris is an accomplished apiarist. Anyone who comes to give a class in a white jump suit and bee-keeper’s garb…automatically gets my attention and respect!. Her presentation on bee-keeping was extremely well done and very informative. I think we all went away with a new appreciation of what these interesting little pollinators do in our gardens. Chris is also a regular presenter on garden topics at the Ida Public Library.
- Jeff Nicita – Best Garden Tour: A most accomplished gardener, Jeff was kind enough to offer his gardens this summer for a private tour. Jeff has an eye for garden layout as well as a large repository of plant knowledge. Linda did an excellent article on the tour, and her photos say it all about his talent’s as a landscaper. We are lucky to have Jeff as a member even though he lives in Wayne County and could just as easily belong to their association.
A special recognition should go to Pete Wallace, another out of the area MG who was in my class of 2009…for his hard work and financial contributions to make our latest public project a reality. Next spring, the sundial will be unveiled in the Veterans Park for all to see and enjoy. Jennie Stanger also was a major contributor as well as coordinator for this project, and deserves our thanks.
There are I am sure others I have omitted, but also deserving of your recognition…Gail Keane with her labors at the Conservation District plant sale; Chris Kosal with her involvement at the YMCA, Dorsch Library gardens and website committee; Jessie Green and Debi Beier for their preparing plant labels for the gardens and activities in the Bedford garden tours, and the committee members who produce the newsletter and handle everything from promotions to booking speakers.
…………….
Kudos also to Paul for maintaining the association on an even keel during these troublesome times with MSUE. Keeping a MG association going requires commitment from all – not just a few. Everyone has to reach inside themselves and see how they can contribute more to support the obligation this entails. To do otherwise may well jeopardise the survival of the club as a MG association.
Let’s plan on making next year an even more productive one as we face the challenges of the extension office closing.
Frank.
Hack House Gardens
Posted in Community Projects, Events, Garden Showcase, Uncategorized on October 19, 2011| 1 Comment »

Sign garden at Hack House
When I wrote this article last weekend looking out the window at the blustery, soggy scene – I began to think how lucky the Milan folks were with the simply gorgeous weather they had for their annual Fall Festival at Hack House.

SW porch repairs
On the contrary, this old house now serves as a living museum of what “life” was like in late 19th century rural Milan. The outbuildings and main house have been filled with numerous period furnishings and artifacts worthy of Sauder Village – with the added bonus that most of these are original to the structure. This is really a “must see” for anyone with children to not only connect them with their local roots, but to show how people can come together and volunteer their time and labor to preserve a piece of history.

Milan gang at work
Well, this article is supposed to be about the gardens that our hard working MGs, Naida, Norma, Amy, Doris and Barb and their fellow Milan Garden Club members managed to wrestle out of a pile of overgrown thickets! Naida is currently down in the wilds of Brazil, so I am posting her emailed comments about how the gardens came into being.
“The Milan Garden Club, which was formed in 1998, was looking for a community project. In the spring of 1999, one of our members, who belongs to the Milan Area Historical Society, suggested we establish and maintain a few flower gardens at the Friend/Hack House museum.

SE porch front garden
We started slowly the first couple of years – with a lot of willing helpers and some very good advice from Jennie Stanger – and our projects and gardens expanded quickly. In 2007 we decided to create a new garden area in front of ( at first glance) a chicken coop. We later discovered it had held exotic birds and was used in 1888 as an aviary.

Aviary front gardens
Shortly after taking on this new area in front of the aviary, we looked to the east side and saw it was just a mass of overgrown wild raspberries, grape vines, junk trees and weeds which we felt detracted from our new garden. About this time, many of our members were” running out of steam” – but that darn Doris Campbell (MG class of 2010) kept gravitating to that area, cutting out brush, etc. I got hooked also and we burned a lot of calories doing our best to clear that area. I even talked my husband into bringing his chainsaw to cut down some of the larger trees. Doris built a tower (about 8ft high x 12ft wide) of brush – and finally got help from some friends of the Historical Society to take down more of the very large trees and dispose of our pile.

Half finished aviary brush pile
Like the house and outbuildings, the gardens are a work in progress. We managed to cut back the bulbs and give a quick tidy up of the beds in time for the Fall Festival.”
Naida

Former brush area
So many stories here, but this is just a blog. This house is not your typical 1880 farmhouse. The wood paneling and doors speak of lavishness that came from other than farm labor. The inlaid marble fireplace in the parlor would not look out of place in an expensive home today. The kitchen is “period 1920” and not that unusual – unlike the 3 hole outside privy in a very elegant building that had a somewhat ingenious “flushing” system. They needed it as the farm help lived in the attic over the family quarters!

The blue "Electric Sugar Machine" on stove in Summer Kitchen
The summer kitchen contains an interesting assortment of laundry artifacts – and the “The Electric Sugar Refining Machine” – the profits from which today would be called a stock swindle or ponzi scheme, that funded all this opulence, briefly landed the grieving widow in jail and definitively her husband had he not unexpectedly died. Their farm encompassed what is now the former Ford plant and the original Owens-Illinois corrugated box facility. Infact, Sharon Diefenthaler can recall people living in the house in the late seventies when she worked at the box plant.

The elegant outhouse
After looking at that brush pile, now I can see why the Milan gang made such short work of our garden this year. These gals just thrive on the challenge of knocking a neglected garden into shape. Maybe as an association, we owe them at least one good gardening day to help them in the spring?
The museum is open from May to late November, Sundays 1-4 pm.
The Children’s Garden: a retrospective – By Mary Ellen Babich
Posted in Garden Showcase, MC Demonstration Garden, Perennials on September 14, 2011| 2 Comments »
1 Children’s Garden 1 – In the Fall of 2005 when Jennie asked me to help her with the “Children’s Orchard,” I said “Sure, where is it?” She led me to that awful place along the field edge behind the storage area and the disposal tanks. After completing some much-needed clean-up, Jennie asked me if I would consider renovating the garden. I worked on the design that Winter and with the help of a man and his truck (my husband Calvin) installed the 3 initial hardscape elements that would define the tiny space.
2 Children’s Garden 2 – Stella Kirby popped by the new “Children’s Garden” one evening in May of 2006 and helped me plant the 11 White Chiffon Rose of Sharon. As the small garden grew, Stella continued to help in the garden and she and I became good friends.
3 Children’s Garden 3 – At the end of the first year, the little garden was taking shape. The Rose of Sharon bloomed into September and the Hyacinth runner beans made a spectacular show covering the re-bar tunnel.
4 Children’s Garden 4 – In 2007 hundreds of marigolds and sunflowers filled the garden. Several Master Gardeners started 10 varieties of dwarf sunflowers for the garden – small enough for smallest of garden visitors to enjoy. Jennie suggested expanding the little garden along the field edge.
5 Children’s Garden 5 – By November 2007, with the help of many Master Gardeners’ hands, the expansion was completed. A new path and a stone bridge were installed.
6 Children’s Garden 6 – Year three was an explosion of annual color. The thymes were taking hold, softening the edges of the paths and giving off wonderful fragrances.
7 Children’s Garden 7 – Fall clean-up left the garden a blank canvas again for me to contemplate the next growing season during the winter months.
8 Children’s Garden 8 – Stella painted the rock turtles that dot the dry creek bed and hide in the thymes, adding more whimsy to the little garden.
9 Children’s Garden 9 – The garden continues to grow and mature. The Blue Muffin Viburnum flowered profusely, but failed to hold the much-anticipated blue berries that the birds would have enjoyed.
10 Children’s Garden 10 – The Rose of Sharon, blooming from June through September, are the stars of the garden every year. The garden hosts many visitors, including my Mom who instilled in me a love of gardening, and my youngest granddaughter, Zoe, who helped me plant annuals this year in the garden.
This little garden has been a joy to me and I hope to all who have visited there. It would not be as special a place had it not been for all of the wonderful Master Gardeners who have helped each year along the way. Thank you to all who have contributed to my learning process. The Children’s Garden has been a true “Work n’ Learn” project for me for the past six years.
Is that a Coleus growing in a Fish Poacher? – by Georgeann Brown
Posted in Garden Showcase on August 3, 2011| 2 Comments »

I confess, I love using every odd container that doesn’t look like a clay pot for my garden containers. As many of you know, I obsess about food and my “batterie de cuisine” is proof. Canners, roasters, skillets, colanders, wicker food gift baskets from Harry and David, galvanized wash tubs and yes, a fish poacher (I have 4) are put into service to hold my annuals and cherry tomatoes. The list can be endless. Just remember, the container needs good drainage, my power drill takes care of that. If I don’t like the color, spray paint is my best friend.
Perennials shrubs and small trees can also be potted in a container, but I am programmed to plant those in the ground. Fall is busy enough with removing annuals from the ground, planting next spring’s bulbs and raking, so just thinking about replanting a potted blueberry shrub in the ground gives me vapors.
Since this article really isn’t about me but planning great containers, a few reminders on how, what and where need to be mentioned. It might be a tad late for this year’s showcase but as gardeners’ say, “wait until you see my gardens next year”.
Planting Techniques
To improve aeration and to add weight to the container, line the bottom with pebbles, broken pottery or a few rocks. If the container is large and if weight is the problem, fill discarded onion or potato sacks with the plastic peanuts for bulk (thanks, Jennie).
Container Media
Prepared soil-less mixes are preferred for containers. The basic components of these mixes are organic matter and perlite, vermiculite or sand. Standard mixes are free of disease organisms, weed seeds and insects. (I can supply those all myself). A common proportion is 2 parts organic matter to 1 part perlite, vermiculite or sand. I add additional organic matter from my compost bins. Add a slow-released granular or powdered fertilizer to the soil-less mix. Nutrients are washed away much faster in a container than a plant in the ground.
Planting
Fill your container half full with potting mix. Moisten the potting mix; it should be damp not wet. Remove the plant from its original container, loosen its roots and stand the plant in the soil. Fill the pot with more soil, making sure to get rid of any large air spaces in the soil. The root ball should be level with the surface of the potting soil. Leave some space between the top of the soil and the top of the container so water and soil will not run out of the top.
Two common mistakes are underpotting and overpotting. A good rule of thumb is that the root ball of the plant, when in a pot, should have about 1 inch of soil around it. Water the plant thoroughly.
Watering and Fertilizing
As mentioned previously, most containers, including hanging baskets, will need daily watering. If the top layer feels dry to the touch, water that container until water runs through the drainage holes. Apply a water soluble or liquid fertilizer every few weeks once the plants are established.
Now comes the fun part-plant selection
Or maybe the most stressful

See the big picture when combining plants. We are all familiar with the “spillers, fillers and thrillers concept. The best way to assemble a winning container combination is not to be shy about mixing and matching plants at the garden center. Walk around with your plants and stand back when pondering a possibility. Don’t be too swayed with flowers already in bloom, they come and go; we live with SHADE so foliage is my place to start. Plants with interesting leaves can bring structure, texture and color to a design. Focus on a plant that catches your eye and match it to other plants. Choosing a blend of glossy, matte or fuzzy leaves adds another level of interest. Look for color compatibility, paying attention to intensity among those plants. This doesn’t mean that having a bold contrast in that mix won’t work, it can.
Don’t forget, when you do choose plants, consider your site and the plant requirements.
Late-Season Gardening
If Peter Rabbit or Japanese Beetles have wreaked havoc on your container, don’t despair, drive to the garden store and buy a few new replacement plants. August is the time for bargains and mums. A perfect time to try a few new combinations, besides, I have 3 more fish poachers to fill.

Patio Garden-small spaces, Frank’s Nursery and Crafts
Designing Great Containers, Fine Gardening May 2009
Office of Public Programs, U.S. Botanic Garden July 1991
Georgeann Brown
1992 Master Gardener Class
Color Combo Tool
Posted in Garden Showcase on July 7, 2011| 4 Comments »
Here’s a tip on color combinations. I use photos as a tool for containers or planting areas. You can of course do a “like” or “Contrasting” combination. I take photos all the time in my garden. I save copies and crop some of the plants. It’s best to add the name of the plant as soon as possible. I know I forget what they are sometimes. I then go through the cropped photos and put them together in a collage. Some plants may be able to be divided, others are annuals that I’ll purchase again next year or save. Of course it’s important to know the Sun/Shade requirement. All but one of these plants can take sun or partial shade. The one that needs full shade is the Rex Begonia. I probably will plant that into a separate container so I can make sure it’s shaded. Also that allows me to bring that in the house come Fall. Water consideration also are important.
The best part is that it’s a “Free” way to experiment. No up front costs. You can use photos from gardens you visited, botanical gardens or even internet photos. Then print it out and take it with you to the nursery. No need to buy extras you won’t need. Hope this helps you in your planning.
Do you have a favorite planning method?


Colorful Foliage in the Garden
Posted in Garden Showcase on June 27, 2011| Leave a Comment »
It’s Not always about the Bloom. Consider the color available in foliage and combine it with a bloom to make interesting combinations. Here are a few in my Garden


